…Don’t really mix. I started playing around today trying to build a node tree after getting an interview question about how I would build a spell-checker (short answer: node trees) and became curious about how one would go about building the tree itself from scratch. The result I came up with is certainly not a perfect node tree, but it does build a structure that could be traversed letter by letter to check if a given word is in the dictionary. If you’re interested in actually implementing a node-based tree data structure in your Ruby program, I’d recommend checking out the RubyTree gem.
I initialize each Node based on the letter it’s tracking. The @word_end variable keeps track of whether a given node represents a valid end to a word (so that if you were traversing a path that included the word “hearts” the following would represent valid end points for your word: “e”, “r”, “t”, and “s”). This defaults to false and is overridden if the node can be the last letter in a word. Finally, the @children hash tracks all of this node’s child nodes.
To actually build the node tree, I built a DictionaryTree class which would initializes with an array of words and then converts that array into a node tree:
Let’s break down what’s happening here. In order to build the tree, I iterate through each word and compare it to the pre-existing @word_tree. Each letter is checked by index, and is added to the hash if the node for that letter does not already exist. The method then checks to see if the letter is the last in the word, and sets the node’s @word_end value to true if it is. Finally, the current_hash is set to be not the @word_tree, but the hash containing the children of the current node.
Here’s an example tree for DictionaryTree.new(["hats", "hat", "her", "cat"])
Of course, writing a method like this in Ruby leaves something to be desired. Really, a data tree like this should be written with pointers, not as a nested hash. But, for a quick Ruby experiment, this did create a functional equivalent of a node tree that could be used as a spell-checker. For more info on how spelling correction works, I highly recommend this blog.
So I’m a little bit in love with the jQuery Validation Plugin. It provides easy, immediate validation on forms, analyzing user input as they type and providing instant feedback on validation failures in addition to preventing a form from submitting if it contains any invalid data. However, I found the documentation a little lacking, especially for a JavaScript/jQuery beginner like myself. So I wanted to share a step-by-step implementation guide with a focus on customization. Here’s an example of it in action on Romp, a social networking application I built with @eaud and @japplaba in Rails along with jQuery and AJAX:
DOWNLOAD & INCLUDE IT
Okay, this probably seems ridiculously basic, but this was the first jQuery plugin I’d ever installed! It’s available on the jQuery Validation website. Note that the zip file you download includes a demo and a whole mess of other files, but the one you actually need is jquery.validate.js inside of the dist folder (you may need some of the other files in this folder depending on how complex you’re getting, but this was all I used). If you’re not using Rails, be sure you’ve also included jQuery in your app. If you are using Rails, the manifest includes it for you.
In Rails, all you have to do is pop the jquery.validate.js into /app/assets/javascripts and the manifest file will require it for you. In case you aren’t familiar with it, the manifest file is at application.js and under NO condition should you delete the comments!! The special //= notation is requiring those files for you, and the //= require_tree . is what requires everything in the folder, grabbing you jQuery validation plugin you just included.
You can include your validation code in any file in the javascripts folder, just be sure to change the extensions from .coffee to .js. Rails will automatically compile of your scripts into a single file to be uploaded into your application.
FIND YOUR FORM
If you’re like me you’re going to customize everything about your validations, so that’s how I’m going to walk through this. There are shorter, less customizable options available, and I would recommend checking out this video if you’re interested in that option.
The first thing to do is select the form you’ll be validating using a jQuery object, and make sure it’ll be called when the document is ready, for instance:
The .validate() method comes with the plugin and we’ll flesh it out in just a second. Note that if you are using Rails form helpers, you can customize the id attribute in the html hash like this:
.validate() takes an argument of a hash which will dictate what validations are run and what messages are provided, and allow for the customization of error messages and more. Let’s take a look.
WRITE YOUR RULES
First and most importantly we need to decide what we’ll be validating. Take a look at this example validation hash:
Here we can see a few different options for declaring our validations. Note that validations are called on the name attribute for your form input. If you are using Rails, you should NOT customize the names of your form inputs (even though you can) - it will completely throw off ActiveRecord and prevent you from utilizing mass assignment from the params hash. If you aren’t sure what form_for or form_tag generated as a name attribute for you, I’d recommend using the Chrome Developer Tools to inspect each element and copy the name attribute directly into your validations hash. Note above that non-nested names can simply be written as symbols, while nested names need to be wrapped in quotes like so: "activity[tags][]"
If all you need to do is check that any sort of input was entered for a given field, you can simply write field_name: “required”. Easy!! But if you want to do anything more than that, you include a hash of different requirements as demonstrated in the example above. There are way more examples than provided here, and you can find some of them here. (I’ve yet to find a comprehensive list of every method available, so if you have one please let me know! If you feel like it’s a validation method that should exist, just Google it and it’ll probably come up.) The ones I’ve included should all be pretty self-explanatory, with the exception of the last one, greaterThanMin.
This is a custom method we wrote to ensure that the maximum number would be greater than or equal to the minimum. Here’s what it looks like:
123
jQuery.validator.addMethod("greaterThanMin",function(value,element){returnthis.optional(element)||(parseFloat(value)>=$('#activity_guest_min').val());},"* Amount must be greater than min guests");
Let’s break down what’s happening here. jQuery.validator.addMethod() comes with the plugin and allows us to write our own custom methods. Yay! We then pass in three arguments: the name of our method (as a string), the validation method (a function), and a default error message (again a string). Both the name and error message are simply strings (and the error message is only a default - we’ll go over how to override them in the next section). But let’s talk more about what’s going on in the function.
The function should take two arguments - value and element. value is the same as what you’d get if you called .val() on the form input (it’s whatever the user typed). element is something that you won’t need to manipulate, but you DO need to include it in order to have the first half of the conditional: this.optional(element). You should DEFINITELY maintain this conditional format when writing your own methods. Basically, this.optional(element) will evaluate to true if element == undefined, so the custom validation will never be run if nothing is entered. This is good as it allows you to make the input required separately, both making this method more flexible and providing more accurate error messages to users. So you just write your custom method in the bit after the || - in our case checking to ensure that value is greater than the minimum value entered.
WRITE YOUR ERRORS
All validation methods come with default error messages - however they tend to be pretty bland. All required fields will automatically return the error “This field is required.” More specific rules do provide more specific information, like “Please enter at least 2 characters,” but you may want something fancier than that. Luckily custom error messages are SUPER EASY to write. In your .validate() hash, immediately below all of the rules, just include something like this (rules cut out for brevity):
1234567891011121314151617181920212223
$("#activityForm").validate({rules:{...},errors:{title:“Hey,youneedatitle!”,"activity[name]":{required:"Your activity must have a name, silly!",minlength:"One letter isn't a name...",maxlength:"Keep it short & sweet."},"activity[guest_min]":{required:"Let us know how many people can come!",digits:"It's gotta be a number"},"activity[guest_max]":{required:"Let us know how many people can come!",digits:"It's gotta be a number",greaterThanMin:"Must be greater than or equal to minimum guest number"},},});
So, so easy. Just create a hash that’s identical to your rules hash, and replace the constraints with the error message you would like to appear. If you skip any no worries, the default messages will still show up.
By default error messages will show up immediately after the input, but you can change this! (There are other customizations available which you can check out here - this is the only one I’ll cover). We ran into an issue where the placement of the error message with our checkboxes was really messy. However, customizing it was pretty easy. Here’s what we did to move the error message from the bottom to the top:
As you can see, the custom errorPlacement is just popped into the beginning of our validation hash (rules and errors cut for brevity). It takes two arguments: error and element. It’s important to use an if statement in your function call unless you’d like to change the placement of all of your error messages. In the if statement, use element.attr("name") to find the specific input element that you would like to adjust error placement for. Then you can use jQuery’s .insertAfter() or .insertBefore() (or really whatever you’d like) to customize the error placement. Be sure to include an else statement containing error.insertAfter(element); in order to maintain the default error placement for all other error messages.
BONUS ROUND
jQuery Validate plays super well with HTML5 form validation, which means that validation on new input types like URL and email are automatically run, saving you the headache of writing long obnoxious RegExps. Note that in order for this to happen jQuery Validate automatically adds novalidate="novalidate" to your form tag - don’t freak out, this just prevents the HTML5 validations from being run in lieu of the jQuery Validate functions.
Customizing the way errors appears is also incredibly easy. They’ll automatically just be standard text, but you can customize the text’s appearance by adding CSS to the error class. Here’s what we used to create the errors shown above:
1234
.error{color:#E4003D;font-style:italic;}
Simple, right? Hope this was a helpful guide to getting started with jQuery Validate. Please remember that even though these validations prevent a form from submitting if it contains bad data, it’s still best practice to include validations on your database as well to ensure that no bad data gets in! If you’d like to see the complete code from the example at the top, you can check it out on our GitHub repo.
As someone whose first programming language was Ruby, the transition into JavaScript was rocky, to say the least. But after a week of near-constant rage fueled by missing the 16th closing curly brace and forgetting that my functions won’t do shit unless I call them, I think I’m starting to come to terms with JavaScript, and maybe even… like it a little? And that’s all thanks to jQuery, because jQuery just makes everything in JS so much easier and better, especially when interacting with the DOM.
But I definitely didn’t feel that way at first. No, at first the way I felt about jQuery was more or less: WTF are all these frigging $ about? Why did all these things I learned in regular ol’ JavaScript suddenly stop working? Why aren’t these effing jQuery methods working when I think they should? And WTF are DOM elements anyway?!?!?
… I think I get it now. So the following is the first of two posts documenting how I found the answer to what may seem (at least to those more familiar with JavaScript than I) a fairly basic question: What the hell does it mean when someone tells you that a jQuery object is an array-like collection of DOM elements? This post assumes you have basic experience with HTML, CSS, and JavaScript, but not much else.
THE DOM
Let’s start at the beginning: What on earth is the DOM? I had a vague understanding of the DOM as like… something in the browser… that uses HTML? But that didn’t really seem good enough. So I found the official definition from the World Wide Web Consortium, the group that maintains standards for the DOM:
The Document Object Model is a platform- and language-neutral interface that will allow programs and scripts to dynamically access and update the content, structure and style of documents. The document can be further processed and the results of that processing can be incorporated back into the presented page.
Well, thanks for nothing, W3C. Luckily, other definitions of the DOM exist out there, and have led me to this understanding of a few keys points:
The DOM is a standard model, so it is interpreted the same regardless of browser or language.
The DOM allows us to access and interact with HTML elements as objects (it is object-oriented).
The DOM connects web pages to our scripts by providing a structured representation of those objects.
In other words, the DOM facilitates our access to HTML elements by representing them as objects, and allowing us to use JavaScript (or another language) to easily access and manipulate that HTML. Let’s take a closer look at what that means for us as programmers.
Note: The DOM isn’t only for HTML (it also has models for XML and the Core DOM) but those aren’t important for the purposes of this post.
DOM ELEMENTS AND JAVASCRIPT
Here’s a visual representation of what the hell is going on in the DOM:
All of those boxes represent different kinds of nodes, which are the primary datatypes used by the DOM. In other words, nodes are the friendly little objects that the DOM turns our HTML into! There are a bunch of different node types, only a few of which are represented here, but we’re primarily interested in the element type, because this is primarily what we’ll be calling on in both JavaScript and jQuery methods. (There is limited support for other nodes like text and comment in SOME methods, but their use is not encouraged.)
What is a DOM element exactly? Easy: if you write it in an HTML tag, it’s an element. Here’s some elements:
123
<body></body><!--woah it's an element!--><h1>RAWR</h1><!--omg another one!--><divclass="magic">OMG MAGIX</div><!--elements for everyone!-->
The DOM standard allows us to use JavaScript to grab these elements and operate on them.
In vanilla JavaScript, we access the document object (the node which encapsulates every other node) in order to find a specific DOM element. So, for instance, if we were looking for a div with an id of pterodactyl, we could use the following:
and awesome now contains the pterodactyl div we were looking for. There are a bunch of other JavaScript methods like this for working directly with DOM elements, but honestly you should probably never use them because jQuery.
JQUERY OBJECTS
jQuery is just a JavaScript library that makes your life way better. jQuery objects are like DOM elements only way better. No really, they are pretty much exactly the same (only better). jQuery objects are infinitely easier to work with than DOM elements in their pure form and give us access to a plethora of super handy jQuery methods that do things like allowing us to create animation and alter HTML at runtime. jQuery objects just provide a wrapper object that go around either a single DOM element or a collection of DOM elements, allowing us to use those methods.
There are way too many jQuery methods to go into here, but what I do want to explore are the ways available to get ahold of the jQuery object. The simplest is just to take a pre-existing DOM element and wrap it. That syntax looks like this:
12
varelement="<p>Hey there!</p>"$(element)
So that’s what all the $$$ is about! The $() syntax is just sugar for jQuery() - the jQuery wrapper object. As soon as we wrap the DOM element (or an array of DOM elements), we have access to all of the jQuery methods. The most common way you’ll see this implementation of getting a jQuery object is wrapping $(this) (demonstrated below), because usually you’ll want to get hold of jQuery objects using selectors.
Luckily, turns out this is also SUPER EASY. Just grab your favorite CSS selectors cheatsheet and dive on in! Here are a few examples of how this would be implemented:
123
$('h1')// selects all h1 elements$('#rainbows')// selects the element with an ID of rainbow$('a[href^="https"]')// selects all a elements with an href attribute beginning with "https"
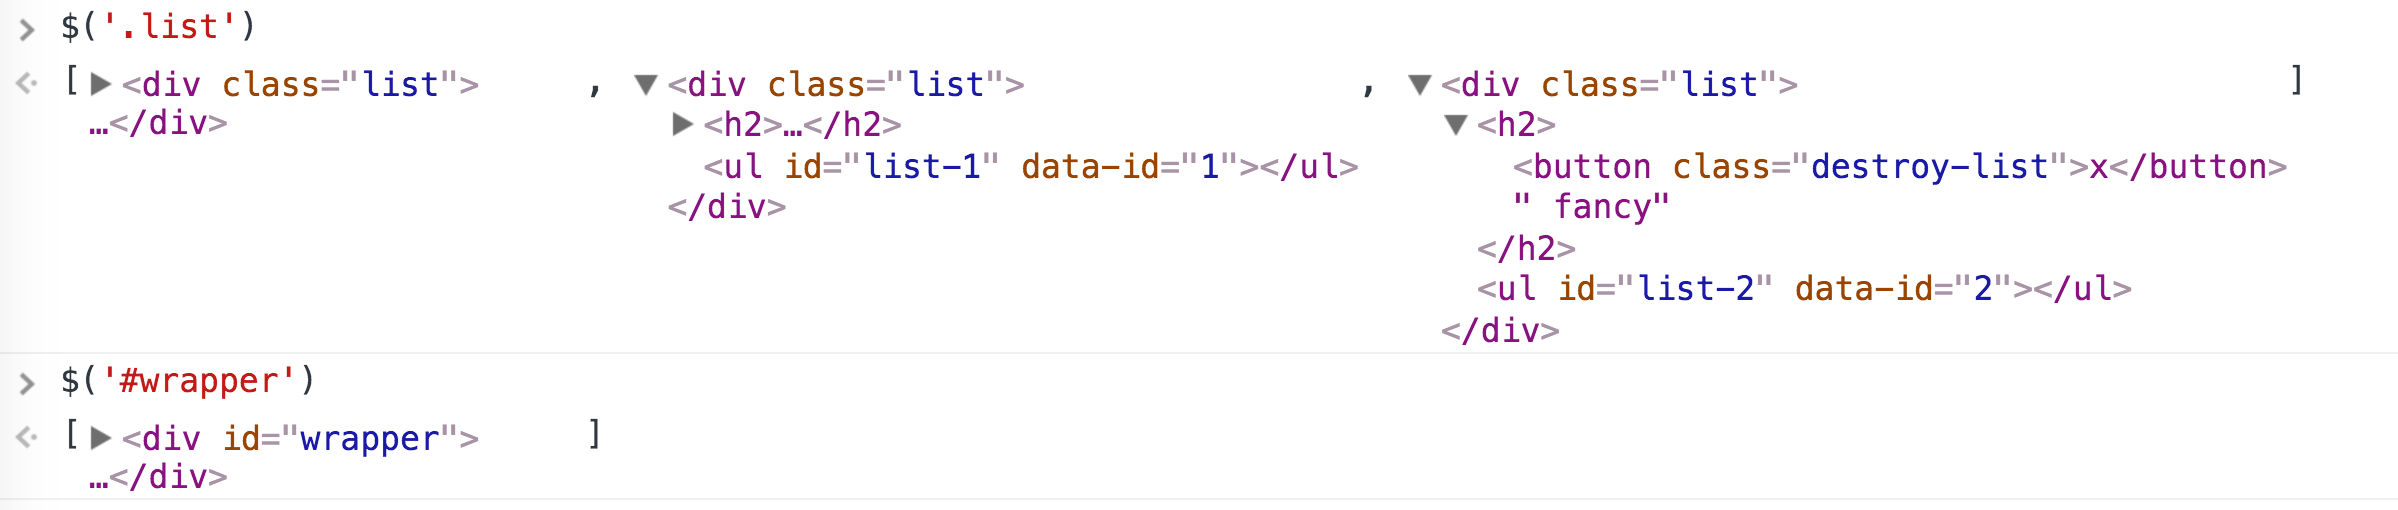
You can create any combination and use any CSS selectors you like. If you check it out in the console, the jQuery object you get back will look like this:
In the first example I’ve selected all the elements with a class of list. I got three objects back, and we can see that it’s not just the tags, but all of the element’s attributes and children. The console allows you to expand and contract your view of the children.
In the second example I selected the object with an ID of wrapper. Note that even though it’s only a single object, is still comes with brackets around it - this array-like notation is an indication that the DOM element is wrapped in a jQuery object. (BUT NEVER FORGET THIS IS NOT AN ACTUAL ARRAY - see part two.)
A third, less common way to create a jQuery object is by wrapping an entire HTML string that does not yet exist on the page. This is less common largely because (to my understanding) it has a much more limited use case. You would want to do this primarily if you needed to call another method or act on the new object after you add it to the page. Here is an example:
Here we actually get so see ALL THREE of the jQuery object method syntaxes we’ve gone over. Let’s take it step by step. On line one we make a jQuery object by wrapping an HTML string that will add the item “dancy party” to a list. My making this HTML string into a jQuery object we gain access to the appendTo() method. As an argument to this method we use a jQuery object that we create through the use of CSS selectors (it’s the <ul> with an id of funtimes).
Great! Our list item is now appended. But we want to be able to hide it on a click (though like, why would you want to hide a dance party?) Luckily we can call the on() method and, thanks to some jQuery magic, have access to a this that isn’t the goddamn window. On line two we see the first method we talked about, directly wrapping up a DOM element (in this case this), which is the first jQuery object - the new string. And this is also why we constructed our first object directly from a string rather than doing the reverse formation:
123
$('ul#funtimes').append('<li>dance party</li>').on('click',function(){$(this).hide()// this isn’t what you think it is})
If we had formulated it this way, when we referenced this we would have been accessing the ul, not the new list item we appended, and clicking would have hid the entirety of the list rather than the specific list item.
FEELING GOOD?
Hopefully by now you’ve got a grasp on what it means for something to be a jQuery object! But there’s plenty of quirks still to explore, so check out (the hopefully shorter) part two where we explore such fascinating topics as:
Why the hell isn’t this acting like an array?
Dammit, now I need to get the plain DOM element back.
What’s going on with this anyway?
Simply put, a self-join table allows us to join an instance of a class to another instance of the same class in a many-to-many relationship. At first glance this is not so different from the more traditional join table used for has-many-through relationships, however because you cannot have two columns in the join table named user_id, implementing self joins requires some finagling.
Perhaps the most common real-world example of needing a self-join table is in social networking, connecting users to users through friendships or following relationships. I set out to implement this in my recent Rails project, and became particularly interested in the different methods available for using self join tables to create reflexive relationships. This blog will walk through all of my steps, but will particularly focus on reflexivity options.
MIGRATION
Creating a self-join table migration can be done nearly the same as to any other join table. Similarly, you can use t.references. In this case, I am creating a friendships model where one column is for :user_id, and the other is for :friend_id, although both have the id of an instance of the User class.
The main difference here is the way that the foreign key is added to the friend column. Because the two columns cannot both be named :user_id, and Rails will not automatically know which groups of foreign keys to check unless we explicitly tell it, this foreign key needs to be added outside of the create_table method. The example of the code is below, but it will always follow the format add_foreign_key :join_table, :model_table, column: :second_name_id
Now that we’ve migrated our table correctly, it’s time to write our models! Our Friendship model looks pretty familiar - it belongs to a :user and a :friend. However, a :friend is actually an instance of the User class. Usually Rails uses magic to automatically associate these relationships using naming conventions, but we can override these conventions when needed. It’s even pretty easy! Just append class_name “Class” to any foreign key that’s not named after its class.
Now we can call user.friends to see what friends a given user has. However, as it stands our friends & friendships leave something to be desired, as only the user identified in the :user_id column of our friendships table. Wouldn’t it be create if these relationships were more reflexive?
ONE DIRECTIONAL (Twitter Model)
One way to create reflexive relationships is what I think of as the Twitter model. These relationships are one-directional; a user can follow someone, and they can have followers, but those relationships are not mutual. In order to set up this relationship, we just need to add two lines of code to our previous User model:
What’s going on here? Let’s break it down. In line 5, we are defining a relationship to the friendships table that goes in the opposite direction. I’ve named it :follows, so the first thing we have to do is override Rails naming conventions to direct it to the proper class (Friendship), which we’ve seen before. But what about this :foreign_key business? Again, all we’re doing here is making explicit something that is implicit in Rails in order to override naming conventions. In a has_many relationship, it is assumed that the foreign key will be named after the class we’re in. However, in this case, we actually want to refer to the other side of that relationship - the :friend_id.
Line 6 is also fairly familiar - we just define :followers through the :follows relationship with just made. However, we again need to override our Rails naming conventions using source. This refers not to the name of the class, but the way the column is named in your join table - so just make it the opposite of whatever you defined as your foreign key in the previous line. Now we can call user.followers and see who has followed a give user!
MUTUAL (Facebook Model)
The second major way I found to create reflexive relationships is mutual - or what I think of as the Facebook model. In other words, if you friend someone, they also become friends with you. The easiest way I found to do this involved using callback methods.
This is actual pretty simply. All that’s happening is that a callback is being implemented in line 5 immediately after a new friendship is created. It simply calls the :create_inverse method which creates a second instance of the Friendship class with an inverse relationship to the original, guaranteeing that both users will be in each other’s collection of friends.
We avoid getting into an infinite creation loop because of uniqueness validation in line 11, which will validates for the uniqueness of :user_id as it relates to the scope of :friend_id.
Note: for some reason this works for me when implemented on my website, but does NOT work in the rails console.
As a baby developer, my first encounters with pry were nothing short of terrifying. But that fear soon turned to love, and an obsession with understanding and exploring the extensive functionalities of this incredibly powerful tool.
This post explores only a few of the lesser-known tools pry provides, with an eye towards Ruby learners at the beginning of their journey. However, it does presume previous experience using pry breakpoints (binding.pry). If you haven’t used it before, you may want to start with the resources at the bottom.
However, pry isn’t just for debugging - you can drop into pry from your terminal at any time simply by typing ‘pry’, and from there you are ready to begin experimenting! You can do anything you can do in irb in pry (only pry is better).
PRY-DOC
One of my personal favorite features of pry is actually a plugin called pry-doc. To install this, simply enter the following into terminal:
gem install pry-doc
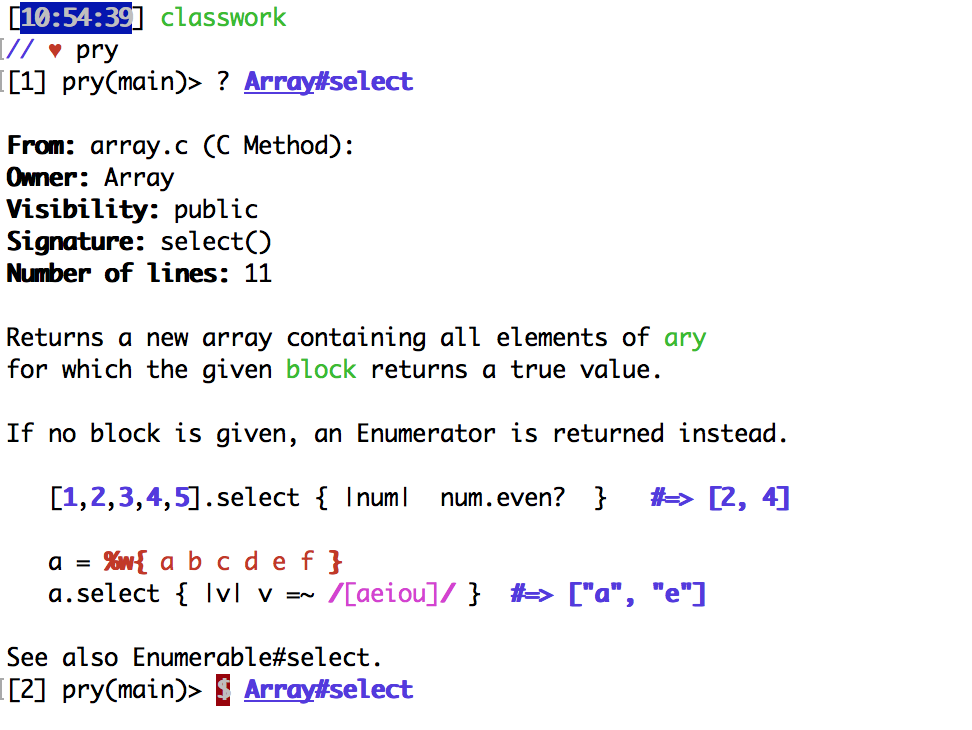
What does this do? Oh you know… Just gives you access to the entire Ruby documentation straight from your terminal!!! I’ve found this incredibly helpful when I can’t remember exactly how a method operates, or need a few quick examples of it in action. Here is a generic example of how to search the documentation:
? Class/Module#method
? is an alias of show-doc And here it is in action:
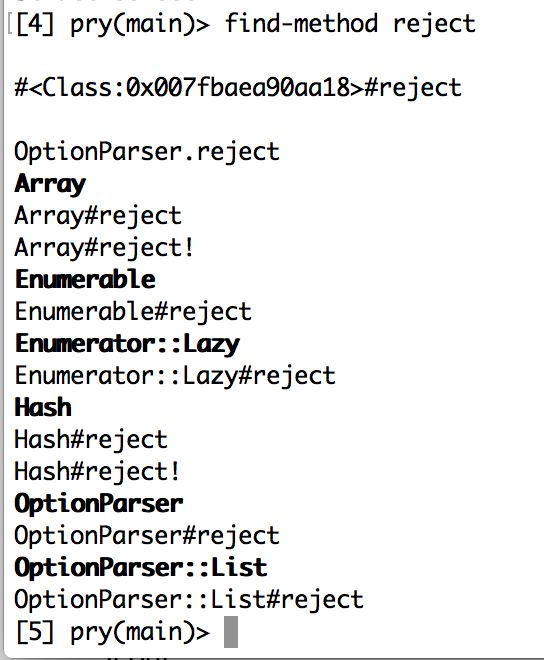
But wait! Maybe you need to know more about the reject method, but can’t remember what class(es) it belongs to. How will you be able to search the documentation? Never fear, pry can help you with that too! Simply type find-method reject (or whatever method you want to find) and pry will pull up a list of classes and modules that can implement the method for you. Searching this way also does not have to be exact, so that our search for reject returns both reject and reject! Check it out:
find-method will ALSO search methods that you have written if you are in a session initiated through a breakpoint.
You can also pull up examples of the source code for any method using show-source Class#method (aliased as $). However, for a baby developer such as myself, this has not proved particularly for Ruby methods as I can’t understand anything written in C, and honestly at this point I just need to know how a thing works.
Flatiron-specific note on using pry-doc: For some reason, pry-doc does NOT play well with learn. If you drop into pry from a directory containing a lab, or your binding.pry was in a lab, you will NOT be able to access the pry-doc. I’m honestly at a loss as to why this happens.
BUT WAIT… WHAT ABOUT METHODS I WROTE?
Glad you asked… because pry can tell you about those too!!!
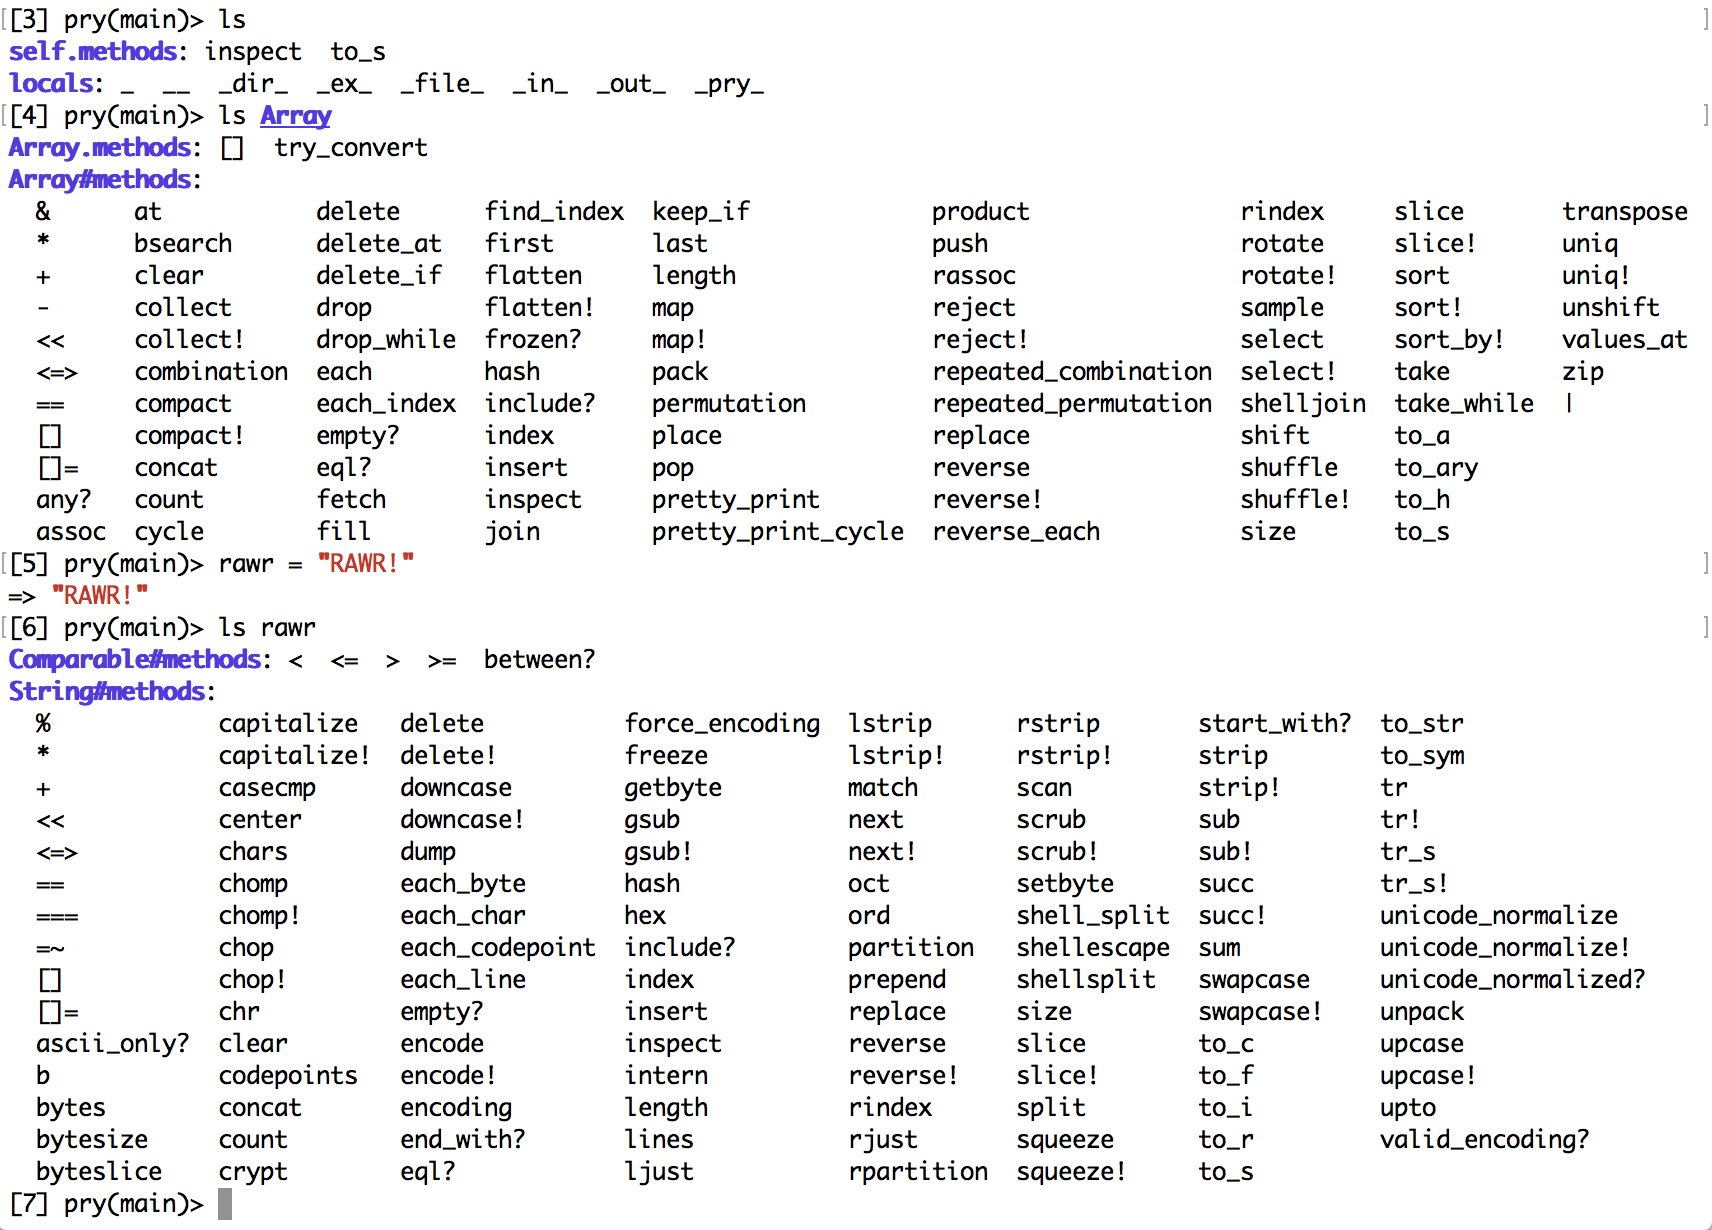
It’s a basic functionality of pry that using the command ls will allow you to see the methods that can be called on a given object. Below are three examples of how this can be implemented:
ls will default to the methods belonging to self (whatever self is at the time)
ls Class/Module will show all methods available to that class and instances of the class
ls variable will show all methods available to that particular object
This seems like it would be pretty helpful in and of itself. BUT! Let’s check out what happens when we call in on classes and instances that we’ve written, rather than those that come with Ruby.
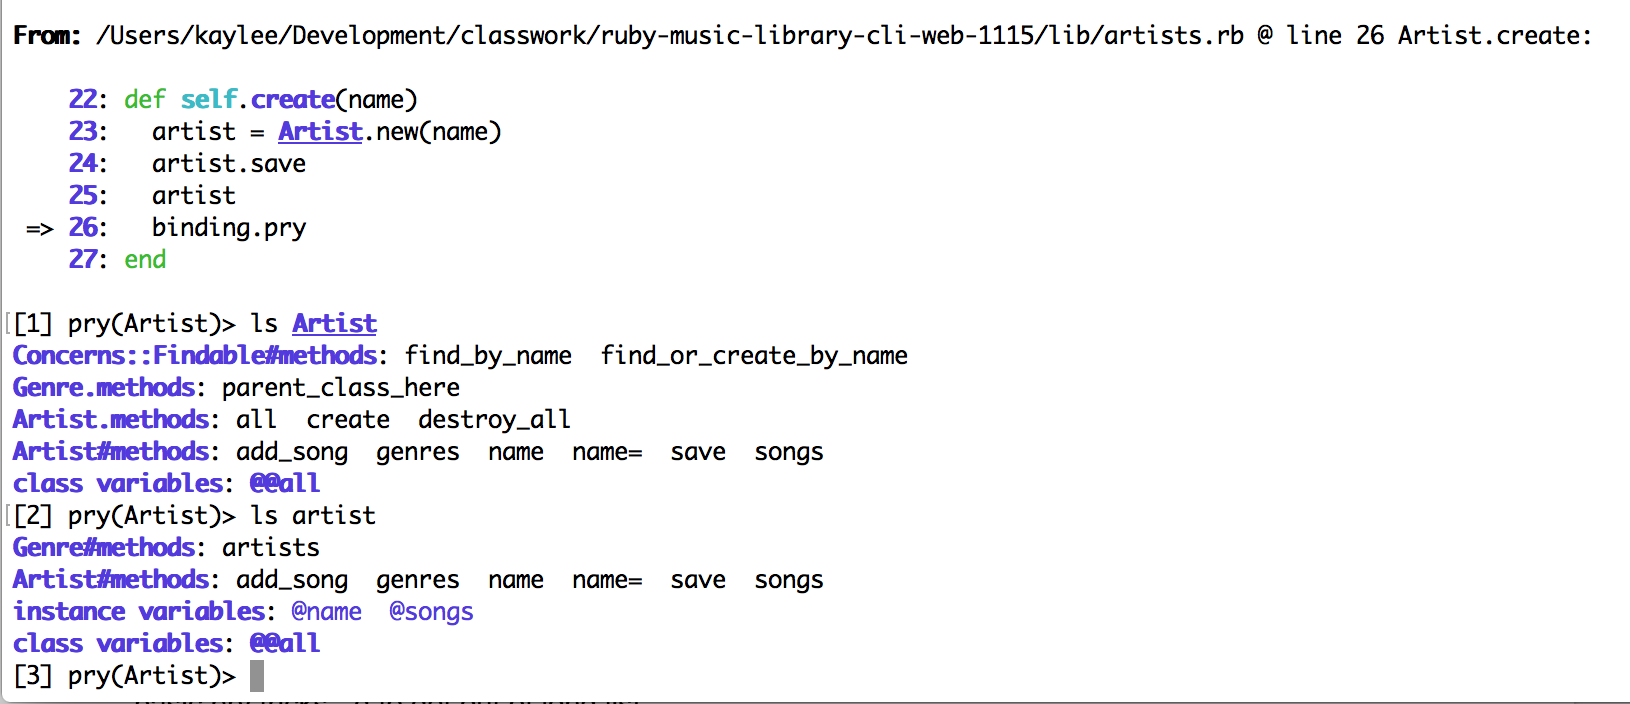
So we’re inside our binding.pry, bopping around and trying to remember what methods a given instance has access to. Let’s see what happens when we call ls on our class Artist, as well as an instance of that class called artist:
Woah! That’s all the methods we wrote. And not only that, but they’re separated out based on inheritance. We can see that under the list for our Artist class, we first get the methods extended from the module Concerns::Findable, then the class methods from the parent class Genre, then the class methods from Artist itself, then the instance methods available to instance of the Artist class, and finally a list of class variables.
In the list for instance artist, we see first the instance methods from the parent class, then the instance methods from Artist, and finally both the instance and class variables. Note that though both the Genre and Artist classes contain #name methods, only the one contained in the Artist class is listed, as it is the one that our artist instance would use based on the rules of inheritance.
You may have noticed that we only see public methods in this list. If you’d like to see private methods as well, you can add a -p flag: ls artist -p, and it will give a list with private methods highlighted. There are many other options as well; calling ls -h provides a full list.
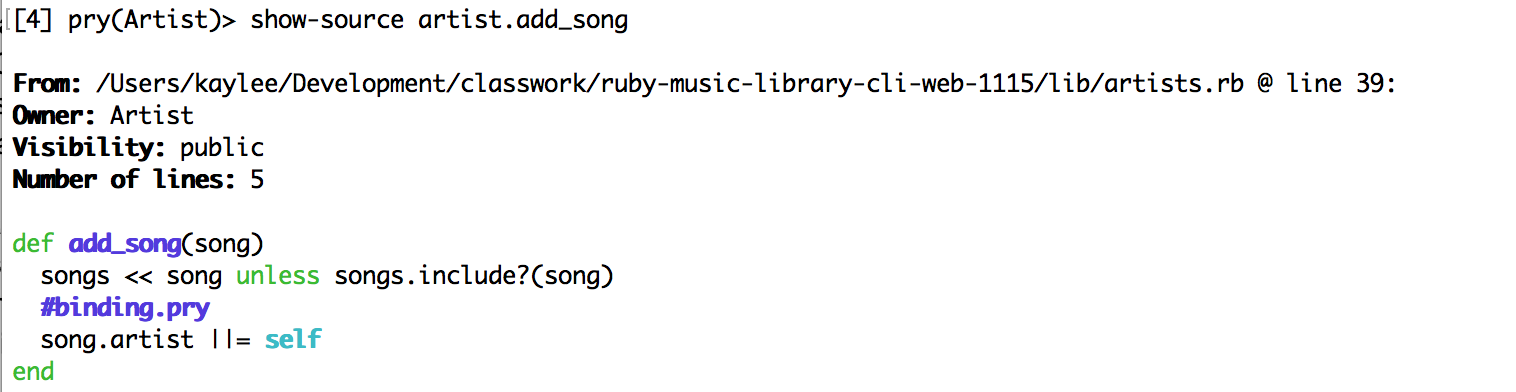
But wait, there’s more!. This app is pretty small, and the methods are pretty simple. But what if I’m debugging a much larger app, one with many more methods and more complex inheritance relationships. What if during the debugging process I can’t figure out why a particular method isn’t behaving as expected? Wouldn’t it be nice if I could see the source code for that method?
By entering show-source Class/instance.method, pry pulls up the source of that method. It gives us the file and line location of the code, the owner (class or module) of the method, and then shows us the code itself so we can understand exactly how it’s operating.
Note that this show-source syntax is slightly different than the one utilized in the pry-doc calls - you put Class.method as opposed to Class#method.
MOVING IN AND OUT OF OBJECTS
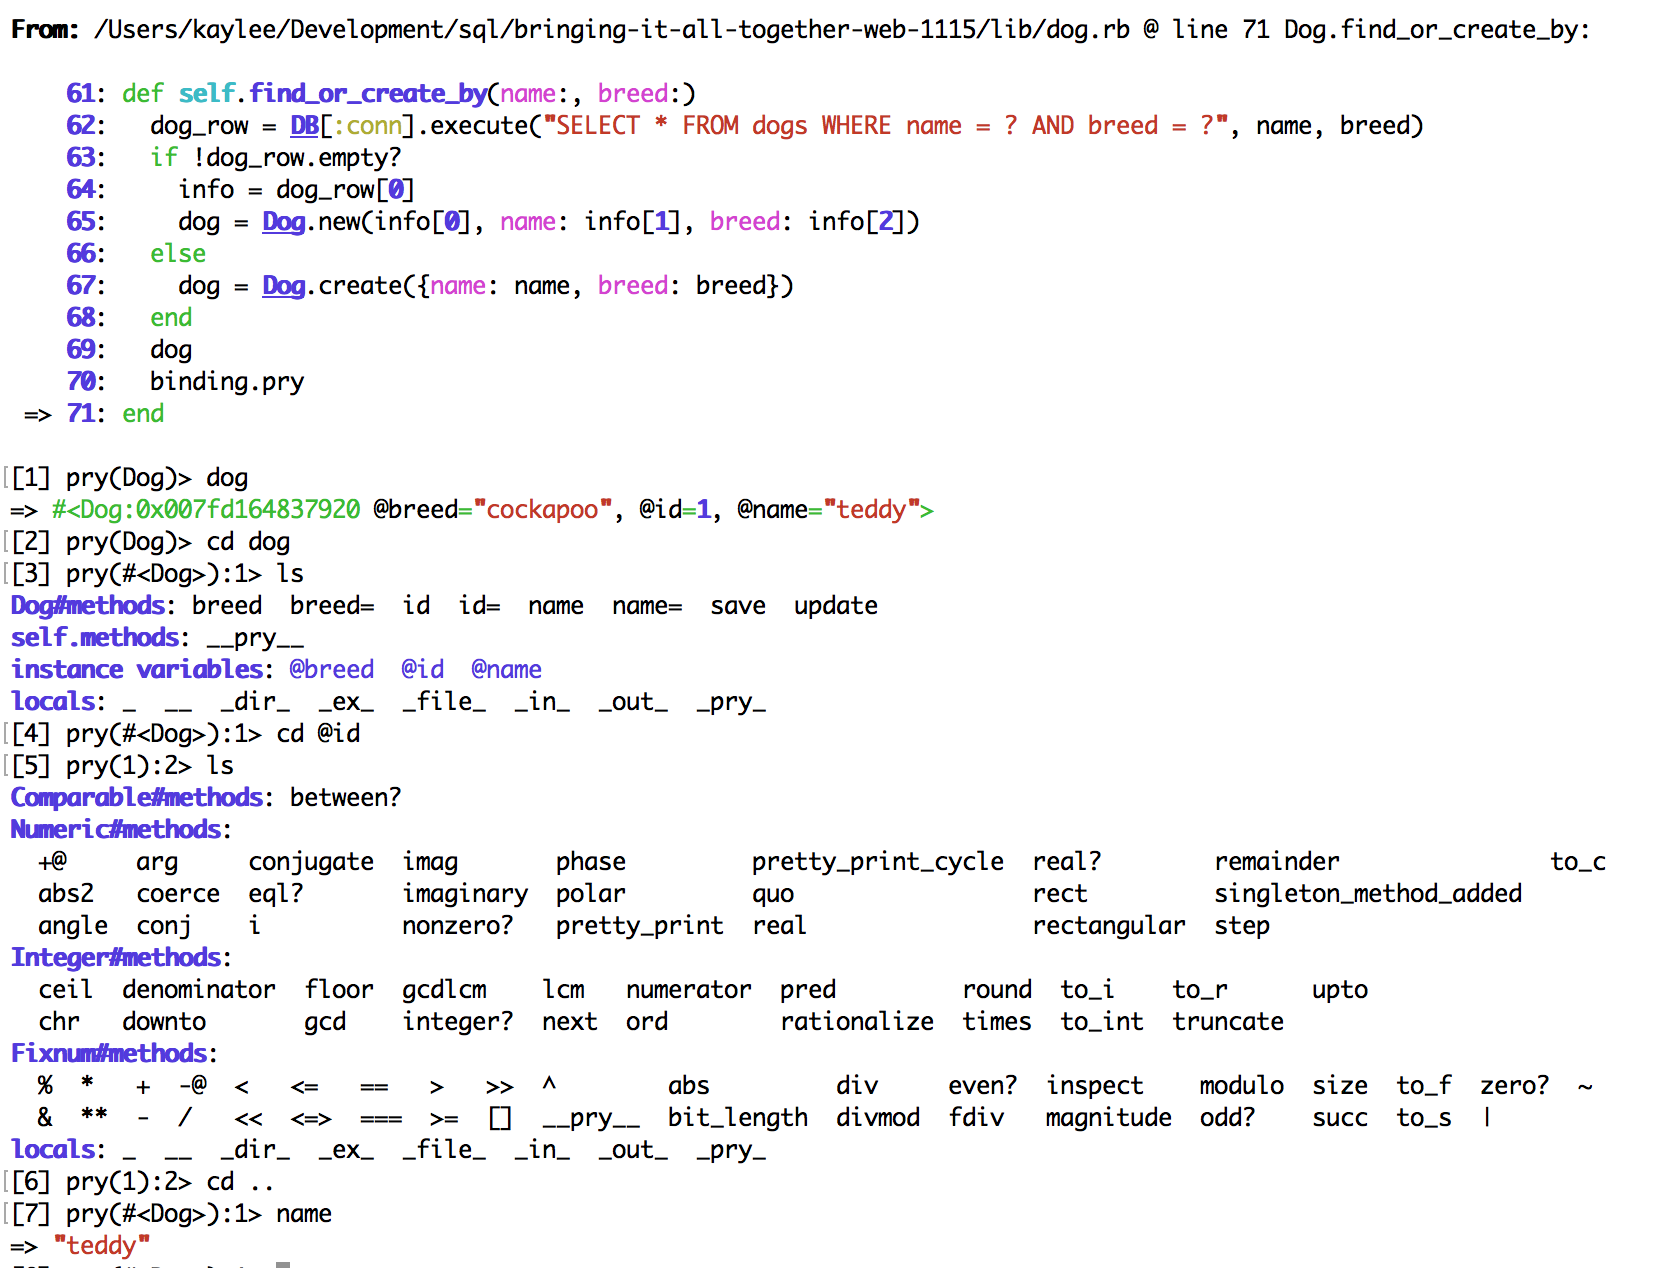
Pry includes a ‘cd’ command that works almost identically to what we’re used to in terminal, except that it allows us to move in and out of objects. Once you ‘cd’ into an object, that object becomes self until you ‘cd’ again, allowing you to directly call commands like ‘ls’ or any methods available to that object. Let’s take a look:
Here we can see that we cd directly into an an instance of the dog class, and that from there ls gives us a list of variable and methods for that object as it is not self. Pry then allows us to cd directly into the instance variable @id, and we can receive a list of methods available for it. Just as in terminal, using cd .. will move us back up a single level, and we can now call the name method directly on our instance of the Dog class.
Pry also helps you keep track of where you are and how many levels you have moved in the cursor the far left where it says: pry(location):level>
QUICK TIPS
Accessing the terminal: Do you need to quickly do something in the terminal but don’t want to exit your pry session? Append a period to any command and it will get passed to the shell:
The list given is for the current directory, not for an item in the code we are prying into.
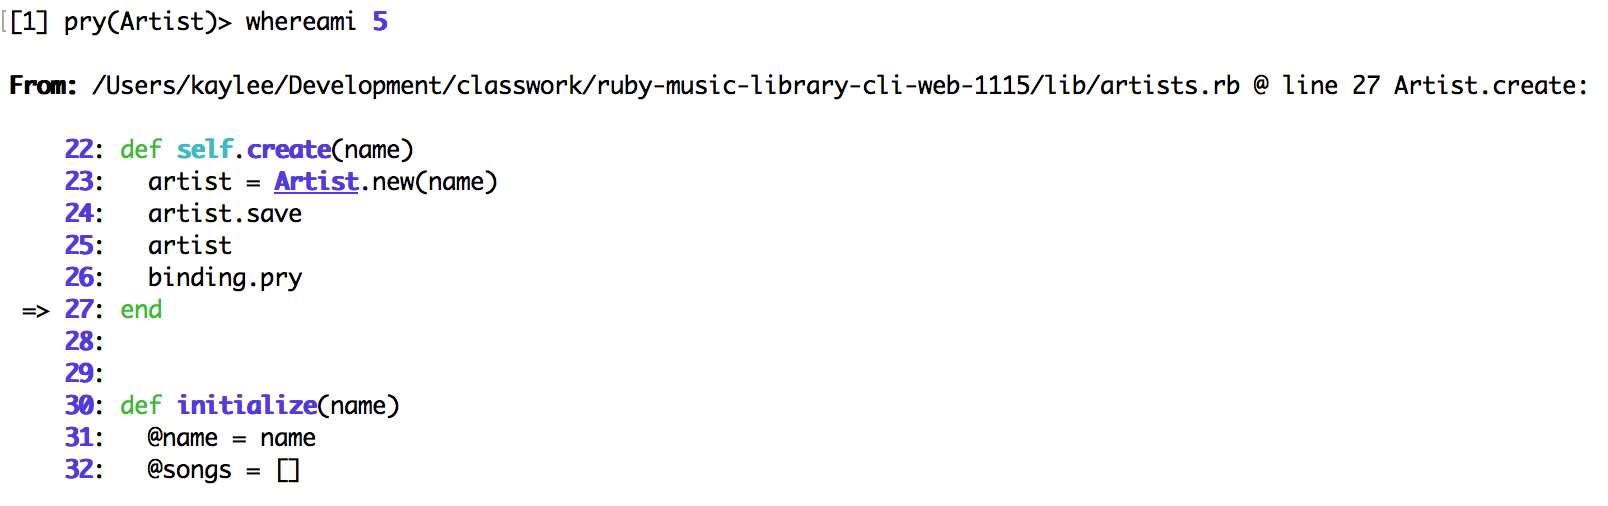
Have you been prying for too long and lost yourself? whereami will remind you where in the code you currently are. This is automatically executed when you open pry, but whereami follows any line plays you may have made, and also takes an optional parameter of the number of lines to show before or after your location, as well as reminding you where in your file this code originates from.
Use prybaby to automatically comment out all of the pry breakpoints in the directory you are working in. Simply run gem install prybaby to get started. Once it’s installed, run prybaby in terminal to comment out your breakpoints. Use prybaby -u to uncomment all the breakpoints, and prybaby -r to delete them. (Beware though - it deletes the entire line containing the binding.pry.) Thanks Sophie for this recommendation!
 In the first example I’ve selected all the elements with a class of